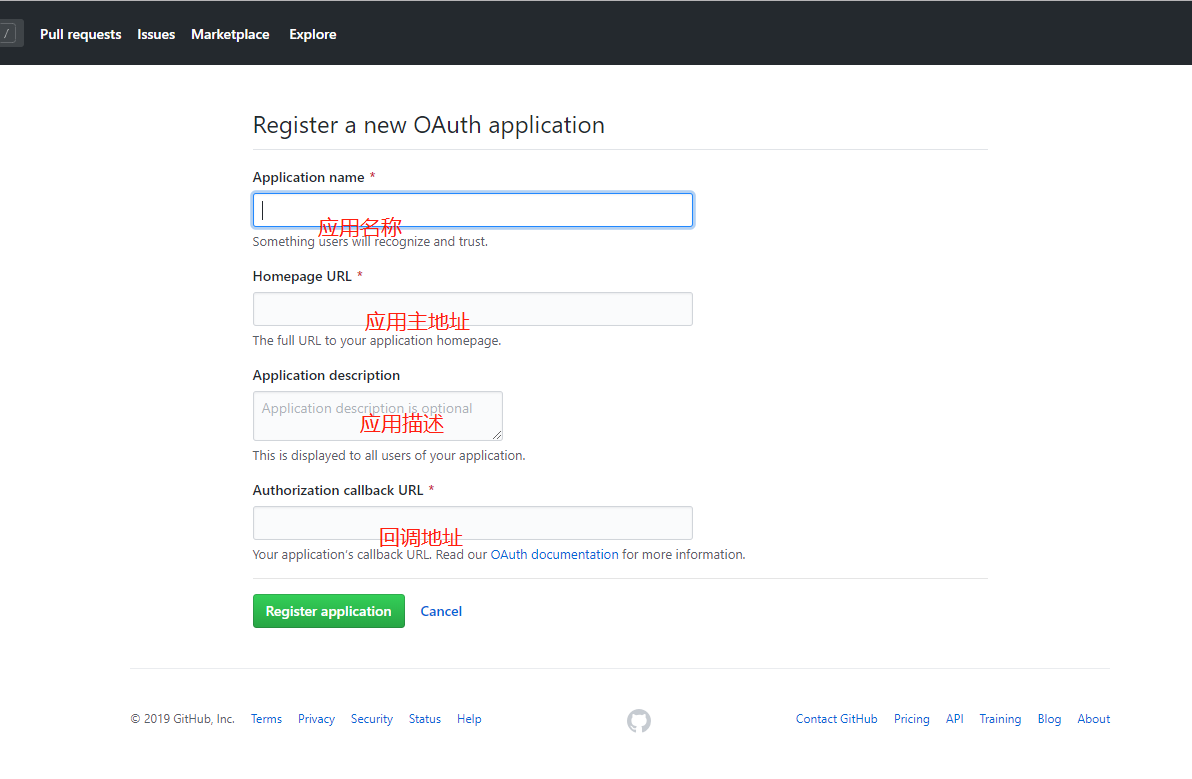
一、创建 Github 应用
https://github.com/settings/apps


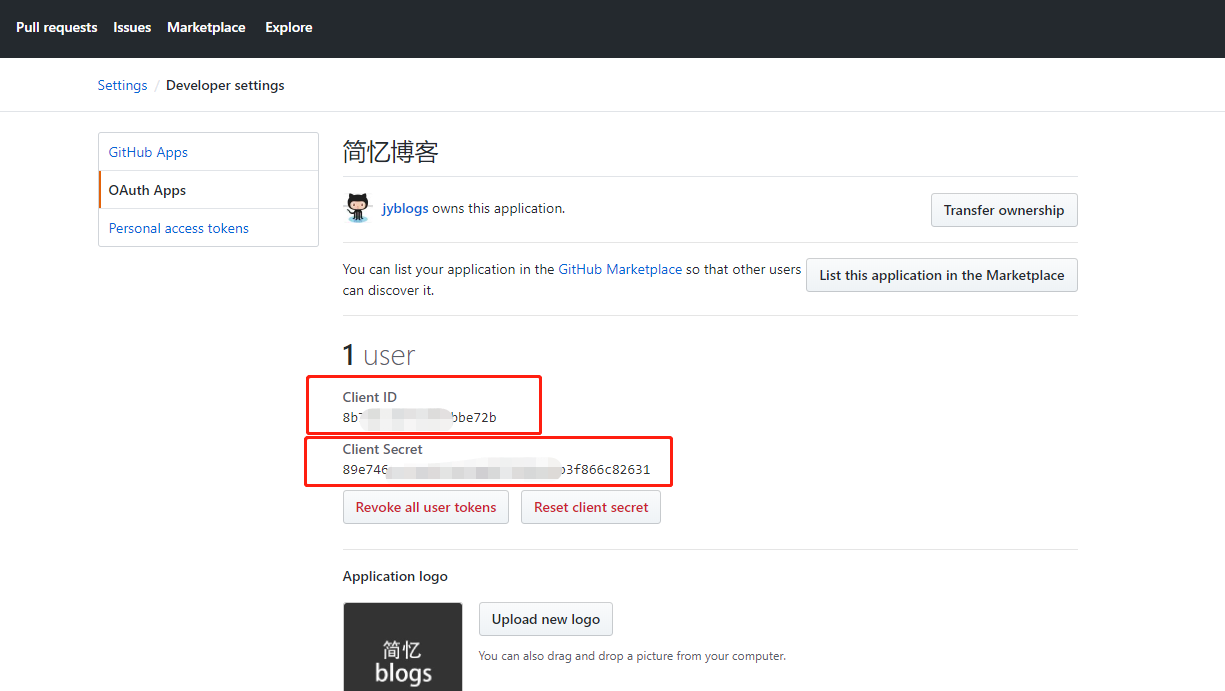
创建应用成功得到 Client ID 和 Client Secret

二、代码实现:
思路:
首先我们申请完应用后会有Client ID和Client Secret
1、通过这两个参数我们去访问:https://github.com/login/oauth/authorize?client_id='你的client id',访问后会返回一个code到我们的创建应用的时候填写的那个callback回调地址。
2、有了code,我们在通过Client ID和Client Secret和code这三个参数去访问:https://github.com/login/oauth/access_token?code=''&client=''&client secret='',这时会返回一个access_token:
3、有了access_token我们在去访问:https://api.github.com/user?access_token='',这时,就能以json格式返回给我们所有的用户信息了~
(1)前端页面放置按钮:
<!DOCTYPE html PUBLIC "-//W3C//DTD HTML 4.0 Transitional//EN">
<html>
<head>
    <meta charset="utf-8"/>
    <meta http-equiv="Content-Type" content="text/html; charset=utf-8"/>
    <title>tetu</title>
</head>
<body>
<h3>第三方登录</h3>
<div class="row other">
    <div class="large-9 columns left">
      <button type="button" class="button tiny defalt expand" onclick="githubLogin();">GitHub登录</button>
    </div>
</div>
<script>
    function githubLogin(){
       //以下为按钮点击事件的逻辑。注意这里要重新打开窗口
       //否则后面跳转到github登录,授权页面时会直接缩小当前浏览器的窗口,而不是打开新窗口
       window.location.href="/index/user/githublogin.html";
     }
</script>
</body>
</html>
(2)后端代码:
    // github登录
    public function githubLogin(){
        $client_id='client_id';
        $client_secret='client_secret';
        header('location:https://github.com/login/oauth/authorize?client_id='.$client_id.'&client_secret='.$client_secret.'&scope=user:email');
    }
    public function Callback(){
        $client_id='client_id';
        $client_secret='client_secret';
        $code=input('code');
        $access_token=$this->curl("https://github.com/login/oauth/access_token?client_id=".$client_id."&client_secret=".$client_secret."&code=".$code);
        // header("location:https://api.github.com/user?$token");
            $info_url = 'https://api.github.com/user?'.$access_token;
            $arrydata = array();
             $arrydata = $this->curl($info_url);
            parse_str($access_token,$arrydata);
               $token = $arrydata['access_token'];
                $url = "https://api.github.com/user?access_token=".$token;
                $headers[] = 'Authorization: token '.$token;
                $headers[] = "User-Agent: 简忆博客";
                $result = $this->curl($info_url,[],$headers);
                $info = json_decode($result,true);
                if (isset($info['id'])) {
                    // 处理获取到的数据
                   var_dump($info);
                }


    }
    public function curl($url,$postData=[],$headers=[]){
        $ch=curl_init();
        curl_setopt($ch,CURLOPT_URL,$url);      //要访问的地址
        curl_setopt($ch,CURLOPT_HEADER,0);
        curl_setopt($ch,CURLOPT_RETURNTRANSFER,1);     //执行结果是否被返回,0返,1不返
        curl_setopt($ch,CURLOPT_SSL_VERIFYPEER,false);
        curl_setopt($ch,CURLOPT_SSL_VERIFYHOST,false);
        curl_setopt($ch,CURLOPT_HTTPHEADER,$headers);
        if($postData){
            curl_setopt($ch,CURLOPT_TIMEOUT,60);
            curl_setopt($ch,CURLOPT_POST,1);
            curl_setopt($ch,CURLOPT_POSTFIELDS,$postData);
        }
        if(curl_exec($ch)==false){
            $data='';
        }
        else{
            $data=curl_multi_getcontent($ch);
        }
        curl_close($ch);
        return $data;
    }


 关于简忆
关于简忆 简忆诞生的故事


 粤ICP备16092285号
文章评论(0)