本文讲解wepy微信小程序框架中引入百度echarts框架,实现折线统计图
效果展示:
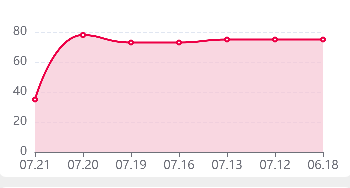
一、下载插件:https://github.com/ecomfe/echarts-for-weixin
二、引入插件:将下载好的文件解压并放到 components 目录
<config>
{
  navigationBarTitleText: 'echarts案例',
  enablePullDownRefresh: false,
  backgroundTextStyle: 'dark',
  usingComponents: {
  "ec-canvas": "~@/components/ec-canvas/ec-canvas"
  }
}
</config>

<script>
 import wepy from '@wepy/core'
 import * as echarts from '@/components/ec-canvas/echarts';
</script>
三、使用插件:
3.1、前端代码
<!-- 图表 -->
<view class="main" >
 <ec-canvas
  id="month-trend-bar-dom1"
  class="month-trend"
  canvas-id="month-trend-bar"
   bind:init="echartBarInit($wx,0)"
  :ec=" ec ">
 </ec-canvas>
</view>
 <!-- 图表 -->
3.2、部分js代码
<script>
 import wepy from '@wepy/core'
 import * as echarts from '@/components/ec-canvas/echarts';

 const app = getApp()
 let globalData = app.$wepy.$options.globalData
 wepy.page({
   data: {

       // 有需要的可进行一些配置
      ec: {

      },
   },
   async onLoad(options) {},
   methods: {
   //图表
   async echartBarInit({detail},id){
   var date = ["07.21", "07.20", "07.19", "07.16", "07.13", "07.12", "06.18"];
   var data =["35", "78", "73", "73", "75", "75", "75"];
    this.initChart(detail.canvas, detail.width, detail.height, detail.dpr, detail.wxNode,date,data)// 调用出初始化方法,进行echart初始化,重点在于传入的wxNode

   },
     initChart(canvas, width, height, dpr, wxNode,date,value) {
       //此方法中可以随意的使用this,可以愉快的动态赋值了
       console.log(this)

       const chart = echarts.init(canvas, null, {
         width: width,
         height: height,
         devicePixelRatio: dpr
       });
       canvas.setChart(chart);
       var option = {
         color:'#ed0046',
         xAxis : [
           {
             type : 'category',
             data : date,
             boundaryGap: false,
           }
         ],
         yAxis : [
           {
             type : 'value',
             x: 'center',
             splitLine: {
              lineStyle: {
               type: 'dashed'
              }
             }
           },

         ],
         series: [
           {
             type:'line',
             smooth: true,
             data:value,
             areaStyle: {
              color:'#f7c7d5',
             }
           }
         ]
       };
       chart.setOption(option);
       // 对传入的wxNode进行chart赋值,
       // 与常规的return chart不一样,此方式下return后没有实际意义
       wxNode.chart = chart;
       // return chart
     },

  }
  })
</script>
这样完成了小程序echarts引入,更多echarts模板,可以参考官方demo的代码。
四、其他问题参考:









 关于简忆
关于简忆 简忆诞生的故事



 粤ICP备16092285号
文章评论(0)